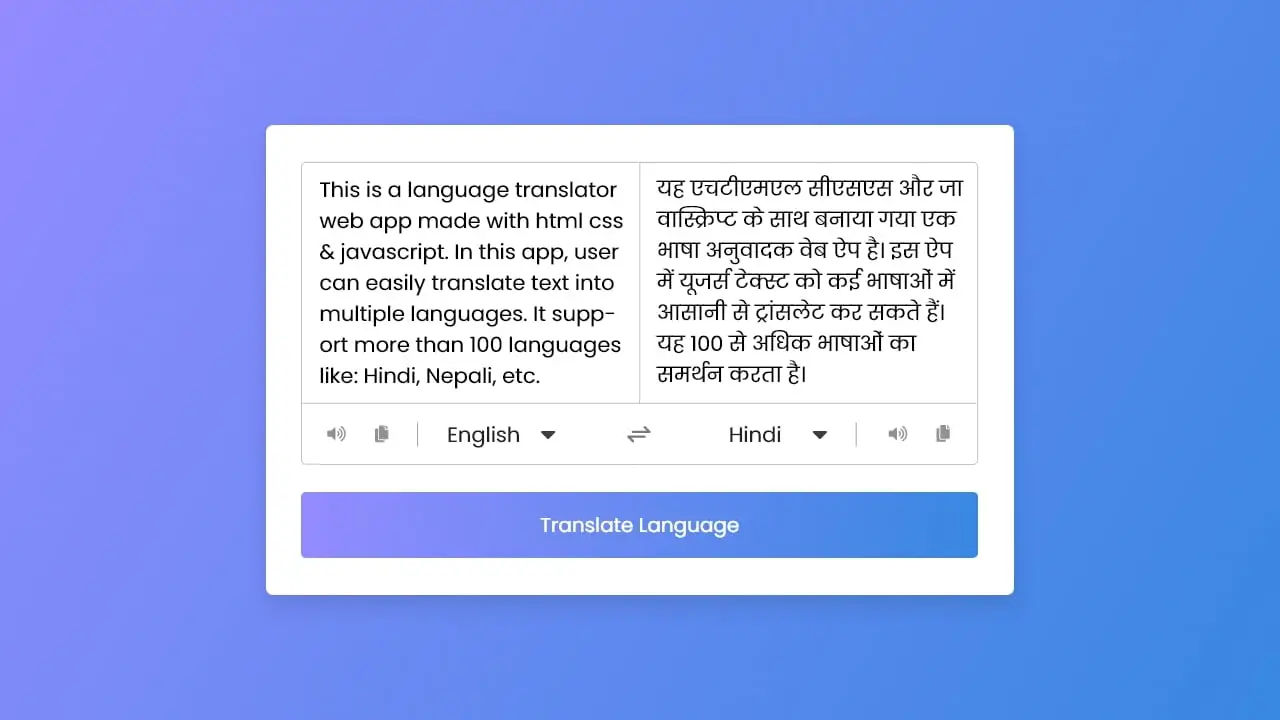
Hey friends, today in this blog, you’ll learn how to Build A Language Translator App in HTML CSS & JavaScript. In the earlier blog, I shared how to Convert a Text To Speech in JavaScript, and now it’s time to create a Language Translator.
Language translator is a program that is used to translate text into multiple languages like Nepali, Hindi, Spanish, etc. In my language translator app, users can easily translate text into different languages, copy translated text, and convert text to speech. It is similar to Google Translate.
If you want to see a demo or full video tutorial of this language translator app, you can watch a given video or click here to see a live demo of this translator app.
Video Tutorial of Language Translator App in JavaScript
I hope you have seen a demo or video tutorial of this language translator app and know how I created it using HTML CSS & JavaScript. As you’ve seen, I used a free API to convert user-entered text into different languages.
This API is used only to convert text into other languages. Other things such as copying translated text and converting text to speech are done with JavaScript.
If you’re too beginner and don’t know about JavaScript array, fetch, and speech synthesis API, then the codes of this language translator might be hard to understand for you. So, before building this project, I suggest you learn these things or watch the above video 2 to 3 times to understand it because, in the video, I’ve explained these things in written comments.
If you liked this language translator app and want to get source code files, you can easily download them from the bottom of this page.
You might like this:
- QR Code Generator in JavaScript
- Get User Location in JavaScript
- Currency Converter in JavaScript
- Random Quote Generator in JavaScript
Language Translator App in JavaScript [Source Codes]
To build this Language Translator App in JavaScript. First, you need to create four Files: HTML, CSS & JavaScript Files. After creating these files just paste the given codes into your file. You can also download the source code files of this translator app from the below download button and I also recommend you to download the source codes files.
First, create an HTML file with the name index.html and paste the given codes into your HTML file. Remember, you’ve to create a file with .html extension.
<!DOCTYPE html>
<!-- Coding By CodingNepal - youtube.com/codingnepal -->
<html lang="en" dir="ltr">
  <head>
    <meta charset="utf-8">
    <title>Language Translator | CodingNepal</title>
    <link rel="stylesheet" href="style.css">
    <meta name="viewport" content="width=device-width, initial-scale=1.0">
    <!-- Font Awesome CDN Link for Icons -->
    <link rel="stylesheet" href="https://cdnjs.cloudflare.com/ajax/libs/font-awesome/5.15.3/css/all.min.css"/>
  </head>
  <body>
    <div class="container">
      <div class="wrapper">
        <div class="text-input">
          <textarea spellcheck="false" class="from-text" placeholder="Enter text"></textarea>
          <textarea spellcheck="false" readonly disabled class="to-text" placeholder="Translation"></textarea>
        </div>
        <ul class="controls">
          <li class="row from">
            <div class="icons">
              <i id="from" class="fas fa-volume-up"></i>
              <i id="from" class="fas fa-copy"></i>
            </div>
            <select></select>
          </li>
          <li class="exchange"><i class="fas fa-exchange-alt"></i></li>
          <li class="row to">
            <select></select>
            <div class="icons">
              <i id="to" class="fas fa-volume-up"></i>
              <i id="to" class="fas fa-copy"></i>
            </div>
          </li>
        </ul>
      </div>
      <button>Translate Text</button>
    </div>

    <script src="js/countries.js"></script>
    <script src="js/script.js"></script>

  </body>
</html>
Second, create a CSS file with the name of style.css and paste the given codes in your CSS file. Remember, you’ve to create a file with .css extension.
/* Import Google Font - Poppins */
@import url('https://fonts.googleapis.com/css2?family=Poppins:wght@400;500;600;700&display=swap');
*{
  margin: 0;
  padding: 0;
  box-sizing: border-box;
  font-family: 'Poppins', sans-serif;
}
body{
  display: flex;
  align-items: center;
  justify-content: center;
  padding: 0 10px;
  min-height: 100vh;
  background: #5372F0;
}
.container{
  max-width: 690px;
  width: 100%;
  padding: 30px;
  background: #fff;
  border-radius: 7px;
  box-shadow: 0 10px 20px rgba(0,0,0,0.01);
}
.wrapper{
  border-radius: 5px;
  border: 1px solid #ccc;
}
.wrapper .text-input{
  display: flex;
  border-bottom: 1px solid #ccc;
}
.text-input .to-text{
  border-radius: 0px;
  border-left: 1px solid #ccc;
}
.text-input textarea{
  height: 250px;
  width: 100%;
  border: none;
  outline: none;
  resize: none;
  background: none;
  font-size: 18px;
  padding: 10px 15px;
  border-radius: 5px;
}
.text-input textarea::placeholder{
  color: #b7b6b6;
}
.controls, li, .icons, .icons i{
  display: flex;
  align-items: center;
  justify-content: space-between;
}
.controls{
  list-style: none;
  padding: 12px 15px;
}
.controls .row .icons{
  width: 38%;
}
.controls .row .icons i{
  width: 50px;
  color: #adadad;
  font-size: 14px;
  cursor: pointer;
  transition: transform 0.2s ease;
  justify-content: center;
}
.controls .row.from .icons{
  padding-right: 15px;
  border-right: 1px solid #ccc;
}
.controls .row.to .icons{
  padding-left: 15px;
  border-left: 1px solid #ccc;
}
.controls .row select{
  color: #333;
  border: none;
  outline: none;
  font-size: 18px;
  background: none;
  padding-left: 5px;
}
.text-input textarea::-webkit-scrollbar{
  width: 4px;
}
.controls .row select::-webkit-scrollbar{
  width: 8px;
}
.text-input textarea::-webkit-scrollbar-track,
.controls .row select::-webkit-scrollbar-track{
  background: #fff;
}
.text-input textarea::-webkit-scrollbar-thumb{
  background: #ddd;
  border-radius: 8px;
}
.controls .row select::-webkit-scrollbar-thumb{
  background: #999;
  border-radius: 8px;
  border-right: 2px solid #ffffff;
}
.controls .exchange{
  color: #adadad;
  cursor: pointer;
  font-size: 16px;
  transition: transform 0.2s ease;
}
.controls i:active{
  transform: scale(0.9);
}
.container button{
  width: 100%;
  padding: 14px;
  outline: none;
  border: none;
  color: #fff;
  cursor: pointer;
  margin-top: 20px;
  font-size: 17px;
  border-radius: 5px;
  background: #5372F0;
}

@media (max-width: 660px){
  .container{
    padding: 20px;
  }
  .wrapper .text-input{
    flex-direction: column;
  }
  .text-input .to-text{
    border-left: 0px;
    border-top: 1px solid #ccc;
  }
  .text-input textarea{
    height: 200px;
  }
  .controls .row .icons{
    display: none;
  }
  .container button{
    padding: 13px;
    font-size: 16px;
  }
  .controls .row select{
    font-size: 16px;
  }
  .controls .exchange{
    font-size: 14px;
  }
}
Third, create a JavaScript file with the name of countries.js and paste the given codes in your JavaScript file. Remember, you’ve to create a file with .js extension. In this file, we’re storing supported countries as an object.
const countries = {
    "am-ET": "Amharic",
    "ar-SA": "Arabic",
    "be-BY": "Bielarus",
    "bem-ZM": "Bemba",
    "bi-VU": "Bislama",
    "bjs-BB": "Bajan",
    "bn-IN": "Bengali",
    "bo-CN": "Tibetan",
    "br-FR": "Breton",
    "bs-BA": "Bosnian",
    "ca-ES": "Catalan",
    "cop-EG": "Coptic",
    "cs-CZ": "Czech",
    "cy-GB": "Welsh",
    "da-DK": "Danish",
    "dz-BT": "Dzongkha",
    "de-DE": "German",
    "dv-MV": "Maldivian",
    "el-GR": "Greek",
    "en-GB": "English",
    "es-ES": "Spanish",
    "et-EE": "Estonian",
    "eu-ES": "Basque",
    "fa-IR": "Persian",
    "fi-FI": "Finnish",
    "fn-FNG": "Fanagalo",
    "fo-FO": "Faroese",
    "fr-FR": "French",
    "gl-ES": "Galician",
    "gu-IN": "Gujarati",
    "ha-NE": "Hausa",
    "he-IL": "Hebrew",
    "hi-IN": "Hindi",
    "hr-HR": "Croatian",
    "hu-HU": "Hungarian",
    "id-ID": "Indonesian",
    "is-IS": "Icelandic",
    "it-IT": "Italian",
    "ja-JP": "Japanese",
    "kk-KZ": "Kazakh",
    "km-KM": "Khmer",
    "kn-IN": "Kannada",
    "ko-KR": "Korean",
    "ku-TR": "Kurdish",
    "ky-KG": "Kyrgyz",
    "la-VA": "Latin",
    "lo-LA": "Lao",
    "lv-LV": "Latvian",
    "men-SL": "Mende",
    "mg-MG": "Malagasy",
    "mi-NZ": "Maori",
    "ms-MY": "Malay",
    "mt-MT": "Maltese",
    "my-MM": "Burmese",
    "ne-NP": "Nepali",
    "niu-NU": "Niuean",
    "nl-NL": "Dutch",
    "no-NO": "Norwegian",
    "ny-MW": "Nyanja",
    "ur-PK": "Pakistani",
    "pau-PW": "Palauan",
    "pa-IN": "Panjabi",
    "ps-PK": "Pashto",
    "pis-SB": "Pijin",
    "pl-PL": "Polish",
    "pt-PT": "Portuguese",
    "rn-BI": "Kirundi",
    "ro-RO": "Romanian",
    "ru-RU": "Russian",
    "sg-CF": "Sango",
    "si-LK": "Sinhala",
    "sk-SK": "Slovak",
    "sm-WS": "Samoan",
    "sn-ZW": "Shona",
    "so-SO": "Somali",
    "sq-AL": "Albanian",
    "sr-RS": "Serbian",
    "sv-SE": "Swedish",
    "sw-SZ": "Swahili",
    "ta-LK": "Tamil",
    "te-IN": "Telugu",
    "tet-TL": "Tetum",
    "tg-TJ": "Tajik",
    "th-TH": "Thai",
    "ti-TI": "Tigrinya",
    "tk-TM": "Turkmen",
    "tl-PH": "Tagalog",
    "tn-BW": "Tswana",
    "to-TO": "Tongan",
    "tr-TR": "Turkish",
    "uk-UA": "Ukrainian",
    "uz-UZ": "Uzbek",
    "vi-VN": "Vietnamese",
    "wo-SN": "Wolof",
    "xh-ZA": "Xhosa",
    "yi-YD": "Yiddish",
    "zu-ZA": "Zulu"
}
Last, create a JavaScript file with the name of script.js and paste the given codes in your JavaScript file. Remember, you’ve to create a file with .js extension.
const fromText = document.querySelector(".from-text"),
toText = document.querySelector(".to-text"),
exchageIcon = document.querySelector(".exchange"),
selectTag = document.querySelectorAll("select"),
icons = document.querySelectorAll(".row i");
translateBtn = document.querySelector("button"),

selectTag.forEach((tag, id) => {
    for (let country_code in countries) {
        let selected = id == 0 ? country_code == "en-GB" ? "selected" : "" : country_code == "hi-IN" ? "selected" : "";
        let option = `<option ${selected} value="${country_code}">${countries[country_code]}</option>`;
        tag.insertAdjacentHTML("beforeend", option);
    }
});

exchageIcon.addEventListener("click", () => {
    let tempText = fromText.value,
    tempLang = selectTag[0].value;
    fromText.value = toText.value;
    toText.value = tempText;
    selectTag[0].value = selectTag[1].value;
    selectTag[1].value = tempLang;
});

fromText.addEventListener("keyup", () => {
    if(!fromText.value) {
        toText.value = "";
    }
});

translateBtn.addEventListener("click", () => {
    let text = fromText.value.trim(),
    translateFrom = selectTag[0].value,
    translateTo = selectTag[1].value;
    if(!text) return;
    toText.setAttribute("placeholder", "Translating...");
    let apiUrl = `https://api.mymemory.translated.net/get?q=${text}&langpair=${translateFrom}|${translateTo}`;
    fetch(apiUrl).then(res => res.json()).then(data => {
        toText.value = data.responseData.translatedText;
        data.matches.forEach(data => {
            if(data.id === 0) {
                toText.value = data.translation;
            }
        });
        toText.setAttribute("placeholder", "Translation");
    });
});

icons.forEach(icon => {
    icon.addEventListener("click", ({target}) => {
        if(!fromText.value || !toText.value) return;
        if(target.classList.contains("fa-copy")) {
            if(target.id == "from") {
                navigator.clipboard.writeText(fromText.value);
            } else {
                navigator.clipboard.writeText(toText.value);
            }
        } else {
            let utterance;
            if(target.id == "from") {
                utterance = new SpeechSynthesisUtterance(fromText.value);
                utterance.lang = selectTag[0].value;
            } else {
                utterance = new SpeechSynthesisUtterance(toText.value);
                utterance.lang = selectTag[1].value;
            }
            speechSynthesis.speak(utterance);
        }
    });
});
That’s all, now you’ve successfully built a Language Translator in HTML CSS & JavaScript. If your code doesn’t work or you’ve faced any problems, please download the source code files from the given download button. It’s free and a .zip file will be downloaded then you’ve to extract it.


GOOD EVENING SIR, pls sir I would like to know the other app you used in this project apart from vscode
saving code files After downloading only the front end is create not working anything.
your code was downloaded but it was not showing languages in below.when i executed first time the output came but now it was not coming…
It’s helpful go ahead
Great job!. But when I tried to simulate in visual studio code it throws an error like “local host refused to connect ” local host error 8080.How to rectify it
when i play the sound option only english language are able to speak other languages are not able to speak please give me solution
can you send me synopsis of project
how to add other languages ?
how can I add Mandarin Chinese?
How to make comment and translating comment or color text. Please tutorial
How can i move the code to React.js?
How do I add other languages? i don’t see a Dutch option?
Never mind, it’s not in alphabetic order
Your videos are the best! I’ve seen and I watch many to learn Javascript. I like that you don’t talk, but show your relations from class and id tag by hovering and copy pasting from that element. Information is shown faster than speech. I’m a visual learner, so I got absorbed more information from your video than a much longer video with an English speaking instructor!
I honestly enjoy watching and I hope you can post more videos with complex architecture. Clean code buddy!
I would greatly appreciate videos on how to add sort files and file folders on a server with user edit permissions.
🙂
Happy to hear that and definitely I’ll keep posting more videos. Keep watching 🙂
Thanks for this content.
Can i use this for my static website?
Yes, you can use it!
keep it up.
you are doing a great job.
Thanks, I will!
how to add other languges
thanks for sharing. it came handy in my school project
Happy to hear that!
could not download the code because it show dialogue box of ad blocker.
Please, disable adblocker for this site or open this page on the incognito window.
Very interesting