Hello readers, Today in this blog you’ll learn how to create a Copy Text to Clipboard Button using HTML CSS & JavaScript. Previously I have shared a Working Calculator using HTML CSS & jQuery, now it’s time to create copying to the clipboard Button using JavaScript.
What does ‘Copied to Clipboard’ mean? The clipboard is where content goes on your device and computer when you Copy something to Paste later. In Keeper, you can copy record information to the clipboard by tapping the clipboard icon next to the field that you wish to copy.
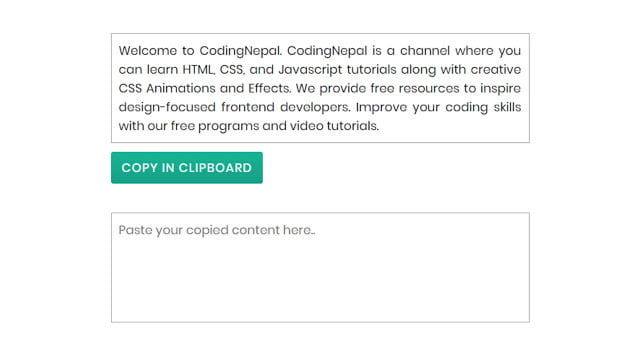
As you can see in the image, there are two textarea boxes and one copy button. When you click on that copy in the clipboard button the upper texts will be selected and copied.
When you click on that button, a small tooltip will appear with sliding from the left side. That tooltip is used to inform a user the text has been successfully copied. If you’re feeling difficulty understanding what I am saying. You can watch a full video tutorial on this program (Copy Text to Clipboard Button).
Video Tutorial of Copy to Clipboard Button in JavaScript
I hope you understood the basic codes behind the creating of this program. As you have seen in the video, to create this program I used HTML CSS & Javascript. Using only HTML & CSS to create this program is impossible. I used HTML & CSS for styling elements like textarea, buttons, and tooltips. And, I used Javascript Document.execCommand(‘copy’) to copy the contents.
If you like this program (Copy Text to Clipboard Button) and want to get source codes. You can easily get the source codes of this program. To get the source codes you just need to scroll down.
Copy Text to Clipboard in HTML CSS & Javascript [Source Codes]
To create this program (Copy Text to Clipboard Button). First, you need to create two Files one HTML File and another one is CSS File. After creating these files just paste the following codes in your file. First, create an HTML file with the name of index.html and paste the given codes into your HTML file. Remember, you’ve to create a file with a .html extension.
<!DOCTYPE html>
<!-- Created By CodingNepal -->
<html lang="en" dir="ltr">
   <head>
      <meta charset="utf-8">
      <title>Copying Texts in Clipboard | CodingNepal</title>
      <link rel="stylesheet" href="style.css">
   </head>
   <body>
      <div class="container">
         <textarea id="copyText" cols="60" rows="5">Welcome to CodingNepal. CodingNepal is a channel where you can learn HTML, CSS, and Javascript tutorials along with creative CSS Animations and Effects. We provide free resources to inspire design-focused frontend developers. Improve your coding skills with our free programs and video tutorials.</textarea>
         <br />
         <div class="btn">
            <button>copy in clipboard</button><span class="tooltip">copied</span>
         </div>
         <textarea cols="60" id="pasteText" placeholder="Paste your copied content here.." rows="5"></textarea>
      </div>
      <script>
         const copyText = document.querySelector("#copyText");
         const pasteText = document.querySelector("#pasteText");
         const button = document.querySelector("button");
         const tooltip = document.querySelector(".tooltip");
         button.addEventListener('click', function(){
           copyText.select();
           pasteText.value = "";
           tooltip.classList.add("show");
           setTimeout(function(){
             tooltip.classList.remove("show");
           },700);
           if(document.execCommand("copy")){
             pasteText.focus();
           }else{
             alert("Something went wrong!");
           }
         });
      </script>
   </body>
</html>
Second, create a CSS file with the name of style.css and paste the given codes in your CSS file. Remember, you’ve to create a file with a .css extension.
@import url('https://fonts.googleapis.com/css?family=Poppins:400,500,600,700&display=swap');
*{
  margin: 0;
  padding: 0;
  box-sizing: border-box;
  font-family: 'Poppins', sans-serif;
}
html,body{
  display: grid;
  height: 100%;
  place-items: center;
}
::selection {
  color: #fff;
  background: #18b495;
}
textarea{
  padding: 10px;
  font-size: 17px;
  resize: none;
  text-align: justify;
  color: #202020;
}
textarea:focus{
  outline-color: #16a085;
  border-color: #16a085;
}
.btn{
  margin: 5px 0 40px 0;
}
.btn button{
  padding: 9px 15px;
  font-size: 17px;
  text-transform: uppercase;
  font-weight: 500;
  background: linear-gradient(#18b495,#16a085);
  border: none;
  color: #f2f2f2;
  cursor: pointer;
  letter-spacing: 1px;
  border-radius: 3px;
  outline: none;
}
.btn .tooltip{
  position: relative;
  margin-left: -10px;
  font-size: 17px;
  font-weight: 500;
  color: #f2f2f2;
  z-index: -1;
  background: linear-gradient(#18b495,#16a085);
  padding: 5px 10px;
  border-radius: 3px;
  text-transform: uppercase;
  letter-spacing: 1px;
  opacity: 0;
  pointer-events: none;
  transition: opacity 0.4s, margin-left 0.4s;
}
.btn .tooltip.show{
  margin-left: 10px;
  opacity: 1;
  pointer-events: auto;
}
.tooltip:before{
  content: '';
  position: absolute;
  height: 15px;
  width: 15px;
  background: linear-gradient(#18b495,#16a085);
  top: 50%;
  left: -5px;
  z-index: -1;
  transform: translateY(-50%) rotate(45deg);
}
That’s all, now you’ve successfully created a Copy Text to Clipboard Button in HTML CSS & Javascript. If your code does not work or you’ve faced any error/problem, please comment down or contact us from the contact page.


sorry bhai wo gusse me kuch bhi dol diya really sorry
but aap na bahot achhe ho yaar
mai front-end sikh raha hu aapke sabhi video bhi dekhta hu aur kahi bhi nahi dekhta hu agar wo video aapke website yaa aapke youtube channel par hai to
dekhta bhi hu aur follow bhi karta hu
really sorry bhai
please maaf kardena yaar
kya faltu website hai yaar tumhari kuch bhi select nahi karne de rahi hai
Sorry for the inconvenience. It has been fixed but makes sure you’ve disabled your Adblocker if you have.
Hi coding Nepal!
How can i copy text from a blockquote?
This codes works in blogger
If yes how it paste in to my post.only code or css file both
Yes it work…Just paste the following codes
Is this code working with WordPress ?
You may did some mistakes…Please check it again.
tooltip not working
Yes due to multiple errors I have changed the tag name of textarea so please check html file.
Not working on my compiler, also the html code is not complete
Great 🙂
Thank You so much CodingNepal i'm gonna Keep Visiting !
Thank you…Keep visiting!