How do I create a tab in HTML and CSS?
A: After reading and watching the following article and videos, you will definitely able to create a tab in HTML and CSS.
Hello, Guys welcome to my new blog on tab design, today I will create tabs by using HTML & CSS. There are several tutorials on the internet about tab design by using JavaScript but now I,m going to create tabs with the help of HTML & CSS only. I have already created various designs that are important for the website and this tab design is also an essential part of the website.
What is Tab in a Website?
In simple form, a tab is the combination of various hyperlinks that contain a different section of an article or other contents as per their topic. Tabs helps to reduce space on the webpage and it makes it easy to use for a quick movement from one tab to another.
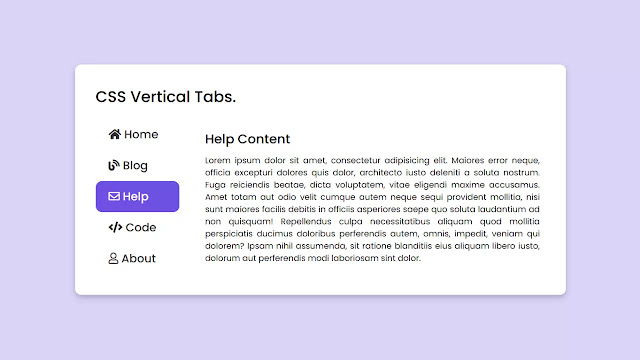
I have given the image of the tab that we are building today. As you can see on the image there are five topics that contain different sections as per their topic. There is on blue indicator inside the help tab and we can see the help content of that tab. I have created this tab design by using HTML and CSS without using javascript.
To see the real animation of this vertical tab design, how it works, and all the code that I have used to make this tab, you can watch the video tutorial that I have provided below.
How To Create Tab Design using HTML & CSS | Video Tutorial
As you have seen in the video tutorial of this vertical tab design when I clicked on every tab different-different section appears according to the tab. When I clicked on those tab blue indicator also moves to the tab. I have also added a hover effect on those topics. To active all the sections for every tab, I have used the HTML radio button.
If you are familiar with HTML & CSS then you can easily make this tab, those friends who are feeling difficult to create this vertical tab design, they can take all source code of this design from below.
You May Like This:
Create Tab Design using HTML & CSS | Free Source Code
To copy-paste the given code of this vertical tab design, first you need to create two files one is an HTML file and another is the CSS file. After creating these two files then you can copy-paste all the given codes in your document. You can also download all source code from the given download button directly.
How do I create a tab in HTML?
Create an HTML file in your compute with the name of index.html and copy-paste the following HTML code of tab design in your document.
<!DOCTYPE html>
<!-- Created By CodingLab - www.codinglabweb.com -->
<html lang="en" dir="ltr">
  <head>
    <meta charset="UTF-8">
    <title> CSS Vertical Tabs | CodingLab </title>
    <link rel="stylesheet" href="style.css">
    <!-- Fontawesome CDN Link -->
    <link rel="stylesheet" href="https://cdnjs.cloudflare.com/ajax/libs/font-awesome/5.15.2/css/all.min.css"/>
     <meta name="viewport" content="width=device-width, initial-scale=1.0">
   </head>
<body>
  <div class="container">
    <div class="topic">CSS Vertical Tabs.</div>
    <div class="content">
      <input type="radio" name="slider" checked id="home">
      <input type="radio" name="slider" id="blog">
      <input type="radio" name="slider" id="help">
      <input type="radio" name="slider" id="code">
      <input type="radio" name="slider" id="about">
      <div class="list">
        <label for="home" class="home">
        <i class="fas fa-home"></i>
        <span class="title">Home</span>
      </label>
      <label for="blog" class="blog">
        <span class="icon"><i class="fas fa-blog"></i></span>
        <span class="title">Blog</span>
      </label>
      <label for="help" class="help">
        <span class="icon"><i class="far fa-envelope"></i></span>
        <span class="title">Help</span>
      </label>
      <label for="code" class="code">
        <span class="icon"><i class="fas fa-code"></i></span>
        <span class="title">Code</span>
      </label>
      <label for="about" class="about">
        <span class="icon"><i class="far fa-user"></i></span>
        <span class="title">About</span>
      </label>
      <div class="slider"></div>
    </div>
      <div class="text-content">
        <div class="home text">
          <div class="title">Home Content</div>
          <p>Lorem ipsum dolor sit amet, consectetur adipisicing elit. Quasi excepturi ducimus sequi dignissimos expedita tempore omnis quos cum, possimus, aspernatur esse nihil commodi est maiores dolorum rem iusto atque, beatae voluptas sit eligendi architecto dolorem temporibus. Non magnam ipsam, voluptas quasi nam dicta ut. Ad corrupti aliquid obcaecati alias, nemo veritatis porro nisi eius sequi dignissimos ea repellendus quibusdam minima ipsum animi quae, libero quisquam a! Laudantium iste est sapiente, ullam itaque odio iure laborum voluptatem quaerat tempore doloremque quam modi, atque minima enim saepe! Dolorem rerum minima incidunt, officia!</p>
        </div>
        <div class="blog text">
          <div class="title">Blog Content</div>
          <p>Lorem ipsum dolor sit amet, consectetur adipisicing elit. Alias tempora, unde reprehenderit incidunt excepturi blanditiis ullam dignissimos provident quam? Fugit, enim! Architecto ad officiis dignissimos ex quae iusto amet pariatur, ea eius aut velit, tempora magnam hic autem maiores unde corrupti tenetur delectus! Voluptatum praesentium labore consectetur ea qui illum illo distinctio, sunt, ipsam rerum optio quibusdam cum a? Aut facilis non fuga molestiae voluptatem omnis reprehenderit, dignissimos commodi repellat sapiente natus ipsam, ipsa distinctio. Ducimus repudiandae fuga aliquid, numquam.</p>
        </div>
        <div class="help text">
          <div class="title">Help Content</div>
          <p>Lorem ipsum dolor sit amet, consectetur adipisicing elit. Maiores error neque, officia excepturi dolores quis dolor, architecto iusto deleniti a soluta nostrum. Fuga reiciendis beatae, dicta voluptatem, vitae eligendi maxime accusamus. Amet totam aut odio velit cumque autem neque sequi provident mollitia, nisi sunt maiores facilis debitis in officiis asperiores saepe quo soluta laudantium ad non quisquam! Repellendus culpa necessitatibus aliquam quod mollitia perspiciatis ducimus doloribus perferendis autem, omnis, impedit, veniam qui dolorem? Ipsam nihil assumenda, sit ratione blanditiis eius aliquam libero iusto, dolorum aut perferendis modi laboriosam sint dolor.</p>
        </div>
        <div class="code text">
          <div class="title">Code Content</div>
          <p>Lorem ipsum dolor sit amet, consectetur adipisicing elit. Tempore magnam vitae inventore blanditiis nam tenetur voluptates doloribus error atque reprehenderit, necessitatibus minima incidunt a eius corrupti placeat, quasi similique deserunt, harum? Quia ut impedit ab earum expedita soluta repellat perferendis hic tempora inventore, accusantium porro consequuntur quisquam et assumenda distinctio dignissimos doloremque enim nemo delectus deserunt! Ullam perspiciatis quae aliquid animi quam amet deleniti, at dolorum tenetur, tempore laborum.</p>
        </div>
        <div class="about text">
          <div class="title">About Content</div>
          <p>Lorem ipsum dolor sit amet, consectetur adipisicing elit. Necessitatibus incidunt possimus quas ad, sit nam veniam illo ullam sapiente, aspernatur fugiat atque. Laboriosam libero voluptatum molestiae veniam earum quisquam, laudantium aperiam, eligendi dicta animi maxime sunt non nisi, ex, ipsa! Soluta ex, quibusdam voluptatem distinctio asperiores recusandae veritatis optio dolorem illo nesciunt quos ullam, dicta numquam ipsam cumque sed. Blanditiis omnis placeat, enim sit dicta eligendi voluptatibus laborum consectetur repudiandae tempora numquam molestiae rerum mollitia nemo. Velit perspiciatis, nesciunt, quo illo quas error debitis molestiae et sapiente neque tempore natus?</p>
        </div>
      </div>
    </div>
  </div>

</body>
</html>
Create a CSS file with the name of style.css and copy-paste the following CSS code of Tab design in your document.
@import url('https://fonts.googleapis.com/css2?family=Poppins:wght@200;300;400;500;600;700&display=swap');
*{
  margin: 0;
  padding: 0;
  box-sizing: border-box;
  font-family: 'Poppins', sans-serif;
}
body{
  height: 100vh;
  display: flex;
  align-items: center;
  justify-content: center;
  background: #dad3f8;
}
::selection{
  background: #6d50e2;
  color: #fff;
}
.container{
  max-width: 950px;
  width: 100%;
  padding: 40px 50px  40px  40px;
  background: #fff;
  margin: 0 20px;
  border-radius: 12px;
  box-shadow: 0 5px 10px rgba(0, 0, 0, 0.2);
}
.container .topic{
  font-size: 30px;
  font-weight: 500;
  margin-bottom: 20px;
}
.content{
  display: flex;
  align-items: center;
  justify-content: space-between;
}
.content .list{
  display: flex;
  flex-direction: column;
  width: 20%;
  margin-right: 50px;
  position: relative;
}
.content .list label{
  height: 60px;
  font-size: 22px;
  font-weight: 500;
  line-height: 60px;
  cursor: pointer;
  padding-left: 25px;
  transition: all 0.5s ease;
  color: #333;
  z-index: 12;
}
#home:checked ~ .list label.home,
#blog:checked ~ .list label.blog,
#help:checked ~ .list label.help,
#code:checked ~ .list label.code,
#about:checked ~ .list label.about{
  color: #fff;
}
.content .list label:hover{
  color: #6d50e2;
}
.content .slider{
  position: absolute;
  left: 0;
  top: 0;
  height: 60px;
  width: 100%;
  border-radius: 12px;
  background: #6d50e2;
  transition: all 0.4s ease;
}
#home:checked ~ .list .slider{
  top: 0;
}
#blog:checked ~ .list .slider{
  top: 60px;
}
#help:checked ~ .list .slider{
  top: 120px;
}
#code:checked ~ .list .slider{
  top: 180px;
}
#about:checked ~ .list .slider{
  top: 240px;
}
.content .text-content{
  width: 80%;
  height: 100%;
}
.content .text{
  display: none;
}
.content .text .title{
  font-size: 25px;
  margin-bottom: 10px;
  font-weight: 500;
}
.content .text p{
  text-align: justify;
}
.content .text-content .home{
  display: block;
}
#home:checked ~ .text-content .home,
#blog:checked ~ .text-content .blog,
#help:checked ~ .text-content .help,
#code:checked ~ .text-content .code,
#about:checked ~ .text-content .about{
  display: block;
}
#blog:checked ~ .text-content .home,
#help:checked ~ .text-content .home,
#code:checked ~ .text-content .home,
#about:checked ~ .text-content .home{
  display: none;
}
.content input{
  display: none;
}
If you face any difficulties while creating your Tab or your code is not working as expected, you can download the source code files for this Animated Tab for free by clicking on the download button, and you can also view a live demo of this card slider by clicking on the view live button.






good job
mats