Hey friends, today in this blog you’ll learn how to create a Cookie Consent Box using HTML CSS & JavaScript. In the earlier blog, I have shared how to Detect Internet Connection using JavaScript. I’ve also already shared many JavaScript Projects that can help in your project so don’t forget to check out.
A cookie is a small text file with small pieces of data (maximum size of 4KB) that the web server stores on the client computer/browser. Cookies help to ensure the user gets the best experience on the website. This blog will show how you can set cookies to the user browser as a cookie consent box using javascript.
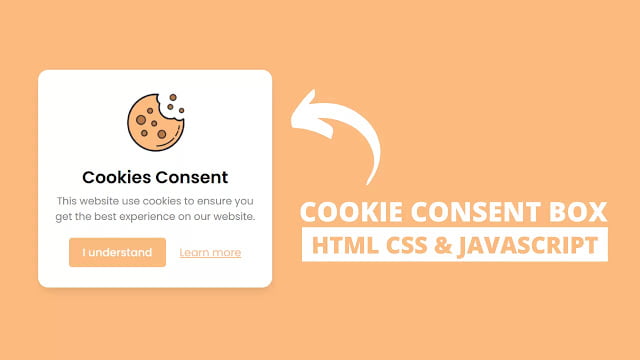
At first, there is a cookie consent box on the web page, which you can see in the above preview image. There is a cookie image, header, short description, button to accept cookies, and a hyperlink for more details about this cookie in this box. This cookie box won’t hide even if you reload the page until you accept the cookies for your browser.
Once you accept the cookie by clicking on the I understand button then the cookie box will hide and won’t show again until you manually remove the cookie of this site from your browser or it’s not expired. In case you block this site from setting cookies to your browser or this consent box can’t set cookies to your browser then there will appear an error alert box. Cookies in this consent box set will be automatically expired after one month but you can increase or decrease the time duration according you want.
Video Tutorial of Cookie Consent Box in JavaScript
In the video, you have seen the demo of this cookie consent box and how I created it using HTML CSS & JavaScript. All design layouts are created using HTML & CSS and to set cookies to the user browser I used a little bit of JavaScript codes. If you’re a beginner then you can also create this type of cookie consent box or you can edit our codes and can take it to the next level.
As you know, nowadays every website uses a cookie to show you relevant ads, information and if you have also a site or project then you can use this cookie box after changing few lines of codes. I hope you love this cookie consent box and the codes to set cookies to the user browser.
You might like this:
Learn to Set Cookies to the User Browser [Source Codes]
To create this program [Cookie Consent Box]. First, you need to create two Files one HTML File and another one is CSS File. After creating these files just paste the following codes into your file. You can also download the source code files of this Cookie Consent Box from the below download button.
First, create an HTML file with the name of index.html and paste the given codes into your HTML file. Remember, you’ve to create a file with .html extension.
<!DOCTYPE html>
<!-- Created By CodingNepal - www.codingnepalweb.com -->
<html lang="en">
<head>
  <meta charset="UTF-8">
  <title>Cookie Constent Box | CodingNepal</title>
  <link rel="stylesheet" href="style.css">
</head>
<body>
  <div class="wrapper">
    <img src="#" alt="">
    <div class="content">
      <header>Cookies Consent</header>
      <p>This website use cookies to ensure you get the best experience on our website.</p>
      <div class="buttons">
        <button class="item">I understand</button>
        <a href="#" class="item">Learn more</a>
      </div>
    </div>
  </div>

  <script>
    const cookieBox = document.querySelector(".wrapper"),
    acceptBtn = cookieBox.querySelector("button");

    acceptBtn.onclick = ()=>{
      //setting cookie for 1 month, after one month it'll be expired automatically
      document.cookie = "CookieBy=CodingNepal; max-age="+60*60*24*30;
      if(document.cookie){ //if cookie is set
        cookieBox.classList.add("hide"); //hide cookie box
      }else{ //if cookie not set then alert an error
        alert("Cookie can't be set! Please unblock this site from the cookie setting of your browser.");
      }
    }
    let checkCookie = document.cookie.indexOf("CookieBy=CodingNepal"); //checking our cookie
    //if cookie is set then hide the cookie box else show it
    checkCookie != -1 ? cookieBox.classList.add("hide") : cookieBox.classList.remove("hide");
  </script>

</body>
</html>
Second, create a CSS file with the name of style.css and paste the given codes in your CSS file. Remember, you’ve to create a file with .css extension.
@import url('https://fonts.googleapis.com/css2?family=Poppins:wght@200;300;400;500;600;700&display=swap');
*{
  margin: 0;
  padding: 0;
  box-sizing: border-box;
  font-family: 'Poppins', sans-serif;
}
body{
  background: #FCBA7F;
}
.wrapper{
  position: absolute;
  bottom: 30px;
  left: 30px;
  max-width: 365px;
  background: #fff;
  padding: 25px 25px 30px 25px;
  border-radius: 15px;
  box-shadow: 1px 7px 14px -5px rgba(0,0,0,0.15);
  text-align: center;
}
.wrapper.hide{
  opacity: 0;
  pointer-events: none;
  transform: scale(0.8);
  transition: all 0.3s ease;
}
::selection{
  color: #fff;
  background: #FCBA7F;
}
.wrapper img{
  max-width: 90px;
}
.content header{
  font-size: 25px;
  font-weight: 600;
}
.content{
  margin-top: 10px;
}
.content p{
  color: #858585;
  margin: 5px 0 20px 0;
}
.content .buttons{
  display: flex;
  align-items: center;
  justify-content: center;
}
.buttons button{
  padding: 10px 20px;
  border: none;
  outline: none;
  color: #fff;
  font-size: 16px;
  font-weight: 500;
  border-radius: 5px;
  background: #FCBA7F;
  cursor: pointer;
  transition: all 0.3s ease;
}
.buttons button:hover{
  transform: scale(0.97);
}
.buttons .item{
  margin: 0 10px;
}
.buttons a{
  color: #FCBA7F;
}
That’s all, now you’ve successfully created a Cookie Consent Box using HTML CSS & JavaScript. If your code does not work or you’ve faced any error/problem then please download the source code files from the given download button. It’s free and a .zip file will be downloaded then you’ve to extract it.


Thanks code nepal. Very simple and nice, just need a button to close and especially not to accept cookies
Hello,
when scroll page cookie box also moves. how I fix this box movement to the bottom?
Use position value to fixed of .wrapper
Hi
First of all thank you for this resource.
After clicking the close button, the box is hidden. But the page transitions appear for a short time. But how do we make sure this is not visible?
Just remove the transition on wrapper.hide{} on CSS file